
ATTENTION: Due to the updates in PRC's website, this tutorial has been updated. Please click the link below for the new step-by-step tutorial.
Updated PRC Online Application Procedures
How to Apply for the LET?
PRC has now utilized and fully implementing the use of LERIS V2 or the Licensure Examination and Registration Information System for its basic professional services from examination application, initial registration, renewal of PRC ID, among others.
This article will give you information on how to do the Online Application for any Board Examination especially the Licensure Examination for Teachers (LET). This includes the step by step procedures in the PRC Online application of various licensure/ board examinations with the requirements to be submitted upon processing and issuance of Notice of Admission (NOA).
Step by Step Procedures: Online Application for Board Exam
1. Before starting registration, prepare the following important information:- Email address with password (e.g., Email Address: [email protected]; Password: PASSWORD123) You can create your email account HERE.
- Mobile number (e.g., 09123456789)
- Personal Information including the date of college graduation
- ID picture in a .jpg format save in the computer, mobile or tablet. Applicant can also request for an e-file should the photo be taken in a photo studio.
- Cedula/ CTC(Community Tax Certificate)
2. Go to LERIS V2 WEBSITE and follow the succeeding instructions:
STEP 1: OPEN ANY WEB BROWER AND GO TO online1.prc.gov.ph
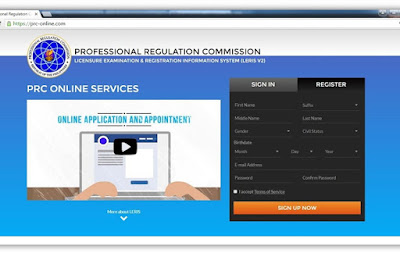
If the applicant is first timer, hit the ‘Register’ tab and start filling out the form. Applicant must use his/her own email account and is only allowed to use one valid email account per applicant.
STEP 2: REGISTER AN ACCOUNT
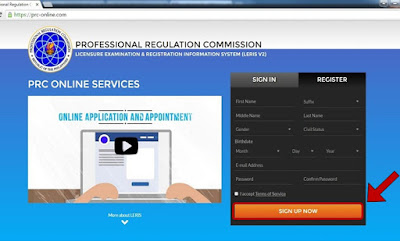
SIGN UP: Complete the following details (First Name, Suffix, Middle Name, Last Name, Gender, Civil Status, Birth date, Email Address, Password and the Confirmation of Password). Do not forget to check the 'I accept the Terms of Service' checkbox, and then press the 'Sign up Now' button.
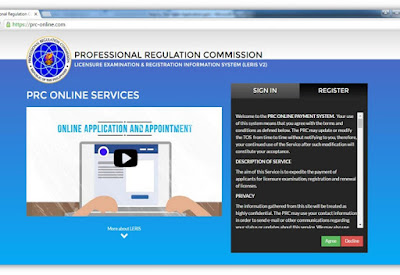
Applicants must read the Terms of Service and click ‘Agree’ if the applicant wants to continue.
STEP 4: VERIFY YOUR ACCOUNT
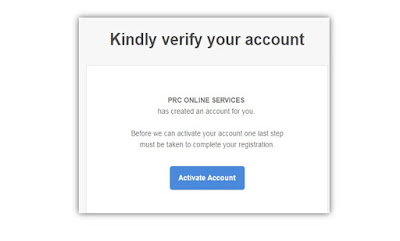
ACCOUNT VERIFICATION: The applicant will receive a verification email from PRC, and must be verified by the applicant before proceeding. In doing so, open the email and locate the verification mail from PRC online services, then click the 'Activate Account' button.
STEP 5: SIGN IN USING YOUR ACCOUNT
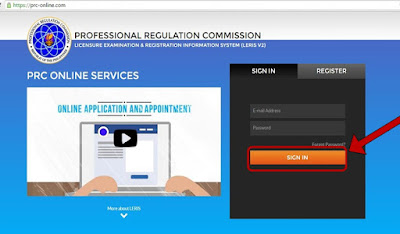
SIGN IN: If the user/applicant has already registered before, refer to the ‘Sign-In’ tab. Enter the email address and password and press the 'Sign-in' button.
STEP 6: COMPLETE THE PROFILE PAGE
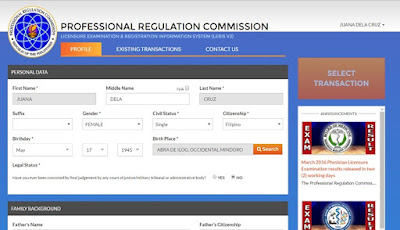
PROFILE: Upon successful verification via email and signing-in successfully, applicant can now complete the 'Profile' page. Make sure that the information provided is accurate. In input forms where 'Search' button appears, don't type any text. Just select what is provided in the dropdown list.
STEP 7: CLICK THE SAVE BUTTON

After filling out the form, review it again then click the 'Save Information' button.
STEP 8: RECHECK YOUR NAME
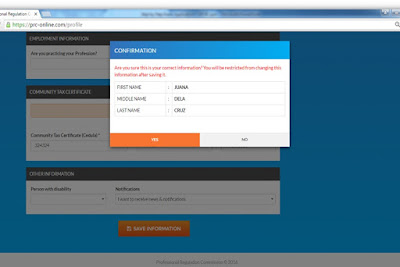
One final verification message for 'First Name, Middle Name and Last Name' will appear once the 'Save Information' button is clicked. Make sure all details are correct since the applicant is not allowed to edit these information anymore after clicking 'Yes' button.
STEP 9: UPLOAD YOUR PHOTO
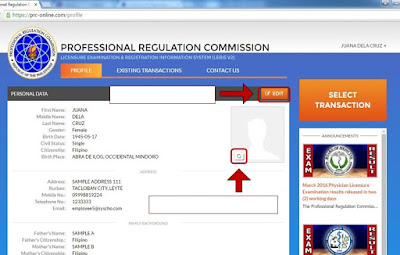
UPLOAD PHOTO: Click the upload photo icon and upload the picture stored in the applicant's device. Please make sure to follow the photo requirements.
ALLOWED PHOTOS

Dos: The photo must be 2 x 2 in size in plain white background, must be no more than six months before uploading and the applicant must wear decent attire with collar.
Don'ts: The photo will not be processed if it does not resemble the applicant, if the applicant wears eyeglasses, background of the photo is not plain white, ears are covered and the photo has shadows.
After reading the rules in uploading photo, the applicant must click 'Okay' button. The uploading page will appear next. Upload the photo using the computer or phone directory.
STEP 10: SELECT TRANSACTION

After successful upload, click on the 'Select Transaction' button, choose 'Examination'. Select the Name of the Examination, Examination Type, Date of Examination, Place of Examination then click the 'Proceed' button.
STEP 11: CLICK PROCEED

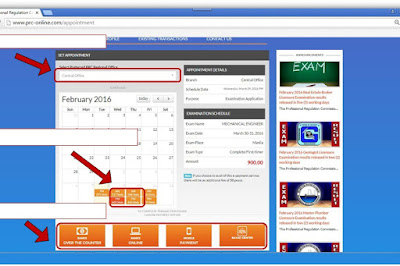
STEP 12: SET AN APPOINTMENT
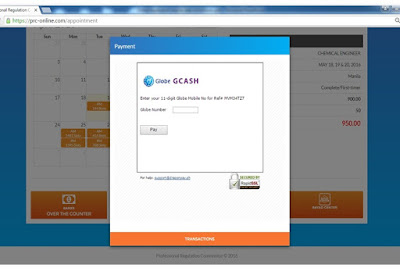
STEP 13: SELECT PREFERRED PAYMENT OPTION
STEP 14: VERIFY THE PAYMENT STATUS

STATUS VERIFICATION: After the payment, the applicant can verify the status of application payment by clicking on 'Existing Transaction' tab. In this page, the applicant can also print the application form. The 'Close' button is below to exit the display.
STEP 15: DOWNLOAD AND PRINT THE APPLICATION FORM

This is one of the papers that you need to bring at the PRC Office together with other requirements.
STEP 16: FINISH AND LOGOUT

LOG-OUT: To exit, click on the name at the upper right corner and click the 'Logout' button. PRC reminds applicants to always logout their account to avoid unauthorized access which may lead to identity theft and other malicious actions.
Finished Registration: The applicant can proceed on the appointment date and bring all required documents.
Select the PRC Office in the dropdown list where the applicant wants to process the application. Choose the appointment date (only in yellow colored) and select the Preferred Payment option below. The payment costs 950 pesos (Php 900 for PRC and 50 for Service Fee)
STEP 13: SELECT PREFERRED PAYMENT OPTION
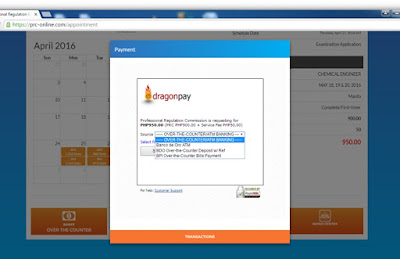
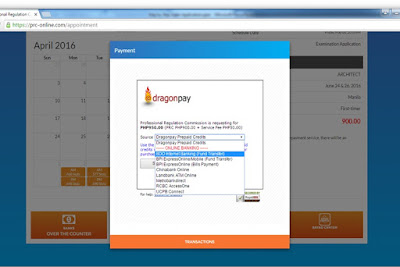
PAYMENT OPTIONS available are Over the Counter in Banks, Online Banking, Mobile Payment and Bayad Center
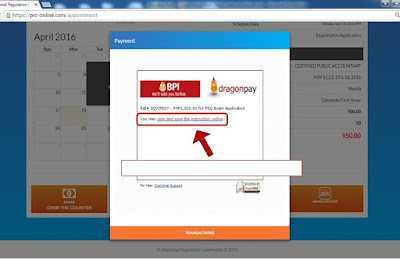
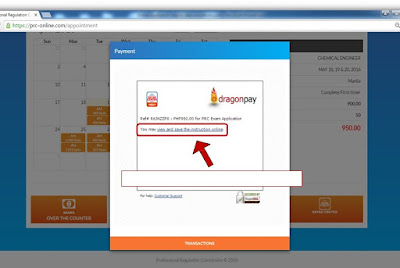
Bank Over the Counter Payment. If the applicant chooses this option, he/she will be asked about the preferred bank(s) for payment (e.g. Banco de Oro, BPI). Click the 'Select' button. A confirmation message will appear with a Reference Number. Copy the reference number. Click on the link for detailed payment instruction.
Online Banking Payment. If the applicant chooses this option, he/she will be asked about the preferred bank for payment (e.g., Banco de Oro Internet Banking, BPI Expressonline, Chinabank Online, etc.). Click the 'Select' button. A confirmation message will appear with a Reference Number. Copy the reference number. Click on the link for detailed payment instruction.
Mobile Payment (via GCash): If the applicant chooses this option, he/she will be asked about his/her GCash account by entering the mobile number. (e.g., 09171234567), then click the 'Pay' button. A confirmation message will appear with a Reference Number. Copy the Reference Number. Click on the link for detailedpayment instruction.
Bayad Center/ Non Bank Over the Counter: If the applicant chooses this option, the confirmation will appear immediately. Copy the Reference Number. Click on the link for detailed payment instruction.
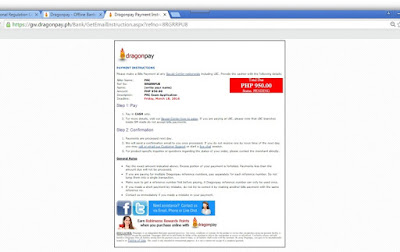
PAY FEES: After clicking the 'View and Save the Instruction Online', this page will appear. This itemized the step by step procedures on how to pay the fees.
STEP 14: VERIFY THE PAYMENT STATUS

STATUS VERIFICATION: After the payment, the applicant can verify the status of application payment by clicking on 'Existing Transaction' tab. In this page, the applicant can also print the application form. The 'Close' button is below to exit the display.
STEP 15: DOWNLOAD AND PRINT THE APPLICATION FORM

This is one of the papers that you need to bring at the PRC Office together with other requirements.
STEP 16: FINISH AND LOGOUT

LOG-OUT: To exit, click on the name at the upper right corner and click the 'Logout' button. PRC reminds applicants to always logout their account to avoid unauthorized access which may lead to identity theft and other malicious actions.
Finished Registration: The applicant can proceed on the appointment date and bring all required documents.


No comments:
Post a Comment